I was down in London for the day job and was able to go and spend the evening at the Affordable Art Fair in Battersea Park, London - every work of art is under £3K. It was really quite good, I was impressed to see a lot of painting, also many nice printmaking galleries with prints in the £100 - £200 range.
Here was the entrance - free wine (well it wasn't free, we had to pay £20 to get in) so we took advantage of a few glasses.
The rows of galleries, it is like an art conference really. Art, art, everywhere.
This was an amazing sculpture, it was made out of strips of fabric, fashioned into the flower forms with was a metal container of engine oil on the plinth. The 'stem' of the lowest flower was just touching the oil.
The fabric was slowly soaking up the engine oil and dis-colouring the fabric. It was absolutely beautiful - sublime.
These were my favourite paintings at the art fair - in a stall put up by a gallery in Madrid.
The painter had a little theme of 'light, dark, light' in his compositions, but by far the best one was the one under the beach pier. (Parking garage one was second favourite)
I could have looked at it for hours, honestly truly a fantastic use of paint and drawing. I was very impressed. Look at how he captured the play of light on the sand...
And finally, the art fair had quite a funny sub-text (well funny to this Texan). Cows.
Cows everywhere. Shaggy ones, funny ones, paintings, prints, sculptures...I took a picture of most of them (some galleries were not as happy about you taking photos...)
This one was my favourite cow picture. It was just really funny!
The scale, the brushwork, the framing, the brave HAIRS on this cows nose...if I had a place in my kitchen for artwork (I don't) I would have bought this one (well if I could have afforded it...) because it just made me LAUGH!
Perhaps next year I can go and buy something???
Tuesday, 26 October 2010
week 40 - Blob bowl continued
My blob bowl is looking good - I refined it a bit more today, smoothed the inside and base, gave it the scalloped edge (which was really the only kind of edge which made sense) and generally finished off the piece as much as I could without 'fiddling' to much. I was worried about getting bits of coloured clay on the croxton clay that would not be visible until after firing so I just stopped messing with it. Anyway I am quite pleased with this! So after I had finished that, I thought it might be nice to make a second one, so I did!
I had a bit of coloured clay left over, so I made a few thin braids (plaits) and pressed it into some croxton and then cut a few Xmas decorations for myself, in case all the other Xmas decorations sell!
Tuesday, 19 October 2010
week 39 - Blob bowl and more Xmas decorations
Back again in Pottery this week...
I dried out some slip clay and rolled it into balls so that I could press it into a plaster mould and make my own spotty/multicoloured version of the black bowl I glazed a few weeks ago.
Now it is all pressed into the mould, I have smoothed out the clay on the inside to join all the pieces together. The inside should have a nice marbled effect as well where the different clays are mingling together.
I used grey croxton clay, dark green clay and dark blue clay. I want to glaze this in the white tin glaze that will react with the coloured slip and make a really nice hazy effect where the pigment from the slip seaps into the glaze in firing! The bowl should be multicoloured and sort of marbled looking on the inside as well.
I also thought those smokey looking Christmas decorations that were marbled with slip looked really great - so I did some more of these with dark green and also used the dark blue slip which I haven't tested before. If they turn out well, they will go for sale on the fundraising stall as well.
That white powder is talc, which helps keep the clay from sticking to the cookie cutters. it will burn away in the first firing.
I wonder why I had the urge to go home and bake after making these??
Labels:
angels,
bowl,
cookie cutter,
decorations,
glaze,
hearts,
nerikomi,
slip decoration,
stars,
tin,
trees,
Xmas
Monday, 11 October 2010
Week 38 - Potting again...
Well after a long period over the summer, I was back to making some new pots this week. I really enjoyed myself! It made me think of some similar window boxes I made about a year ago, which were a real challenge for me at the time. It is quite a contrast to today and how much more confident I felt today making these, and doing 2 at the same time!
I do love building things out of slabs of clay!
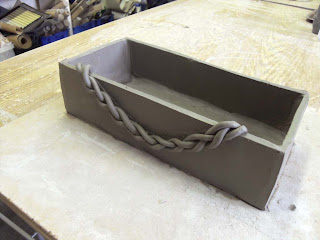
These boxes are just the right size for holding 3 herb plants on the windowsill - Parsley, Basil and Coriander! (Well those are the 3 I have, as my mint likes it better outside!)
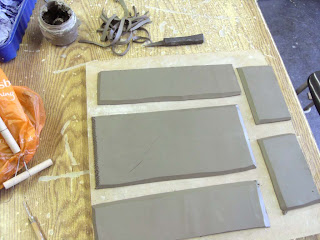
4 sides and bottom measured and cut:
Edges 'chamferred' and scored. Chamfer = Yorkshire for 'cut at a 45 degree angle'
Then you slather on some slip and put all the pieces together
(and add some decoration, in this case a braid so it matches the other items I made earlier this year for the kitchen.)
Getting the second one put together
Both finished and ready to 'rest' for a week.
If they are not too dry, I will do some slip decoration on them and then let them dry out for bisque firing. The one with the stars is a gift for someone who I know also keeps herbs on her window sill!
Wednesday, 6 October 2010
week 37 - Preview of jewelery craft fair items
We had our jewelery making day and it was extemely successful. We made about 30 necklaces, with coordinating earrings and bracelets for the craft sale. The necklaces really set off the the egyptian paste and felted wool beads that we have made on previous making days.
Not too shabby!
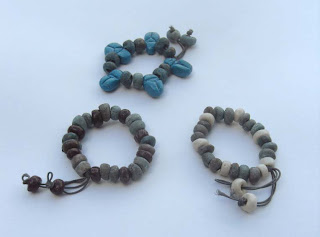
Egyptian paste beads mixed with other beads:
Felted wool beads combined with egyptian paste and other beads:
These are so funky!
This one is really classy looking - shame my poor photography does not show the colour very well.
Egyptian Paste bracelets:
Scarab necklaces:
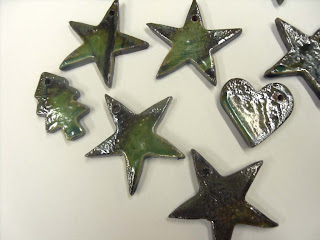
The last of the Christmas Decorations:
These had green slip painted on the clay before we cut out the shapes. The white tin glaze has reacted with the pigment in the slip and made these gorgeous green shadowy markings!
BEAUTIFUL! I think I might have to make more of these before the craft sale!!
It should work with blue slip too...
Monday, 4 October 2010
week 36 - Preview of ceramic craft fair items
There have been loads of great things coming out of the pottery studio for sale at the Christmas Craft fair - I thought I would give a preview so those of you in the UK can make it over on 20 November to see the whole lot! if you have a favourite let me know!
(regarding scale, all of these items are more or less the size of your hand)
Small dishes or candle stands:
Leaf plates - these were the ones looking very Green in the previous posts.
Terracotta is beautiful as well...
These are tree decorations - they turned out really well. This green glaze is great looking and develops a bit of an orange-peel effect in the firing which adds nice texture as well.
These are all 1-2 inches across and we will sell them in packs of 3.
Closeup:
week 35 - a few things I stole...and now love...
The ceramic items that I adopted and glazed have come out of the kiln...
The black bowl, is great, it definitely is getting pride of place on the living room table!
underside and its 3 funny feet. I am defo going to have to make some of my own!
These delicate cups came out so well...I should have double dipped on a few of the glazes, but that faint purple glaze is really quite nice and so are the creamy ones!
This little thrown bowl is sweet, it is now going to live on my bedside table to hold my lip gloss (as it keeps rolling away of the table and into the trash!)
Subscribe to:
Posts (Atom)